Showing posts with label Crafts. Show all posts

Thursday, November 20, 2014

Working with Puppets

By Donovan Zimmerman, Puppeteer, Into the Woods


Here is Milky White at my studio in Saxapahaw in early stages. I started with the sculpting of the head over a clay mold then papier mache’. While the mache’ dried I wove reeds into a body shape to later be wrapped in cloth.

I wanted to make her look under fed and somewhat woebegone so I made rib and hip shapes more pronounced.


Later, I added eyelashes, paint and other details to bring Milky to life.


This is the Chicken that lays the golden egg nearing completion at my studio.The body is a a stuffed cloth shape then covered in feathers. The head is newspaper and tape with cloth attached to a stick which the Jack controls. The beak is made of leather and the eye is glass to give it a reflective quality. It later got a pupil to help it look more life like as well.


The crows came together from pieces shown here. Head, wings, feet all made separately then attached with a mixture of sewing and gluing. This is a view of the slightly chaotic and very messy business o puppet making.


Donovan working with the Black Bird Puppet


To see more of Donovan's work, check out Paperhand Puppet Intervention.

Come see Into the Woods and A Midsummer Night's Dream at PlayMakers thru December 7. For tickets, call 919.962.PLAY (7529) or visit our website.

Tuesday, April 2, 2013

From an Idea to Execution


Remember when Rachel Pollock walked us through how they custom-printed fabric for Cabaret? Here's the idea fully realized! Go here if you missed the original post to see the full story behind the fabric!

Final dress is tonight! All of Jennifer Caprio's designs will be on full display! Previews start tomorrow. Get your tickets now! They're going really fast!

Monday, March 11, 2013

Printing Custom Fabrics


 By Rachel Pollock, Costume Crafts Artisan

One of the first Cabaret projects we began working on in the costume shop was figuring out how to create some of the fabrics themselves. Our costume designer, Jen Caprio, created some costume renderings which depicted several highly specific fabrics with prints we knew we would not be able to purchase. 

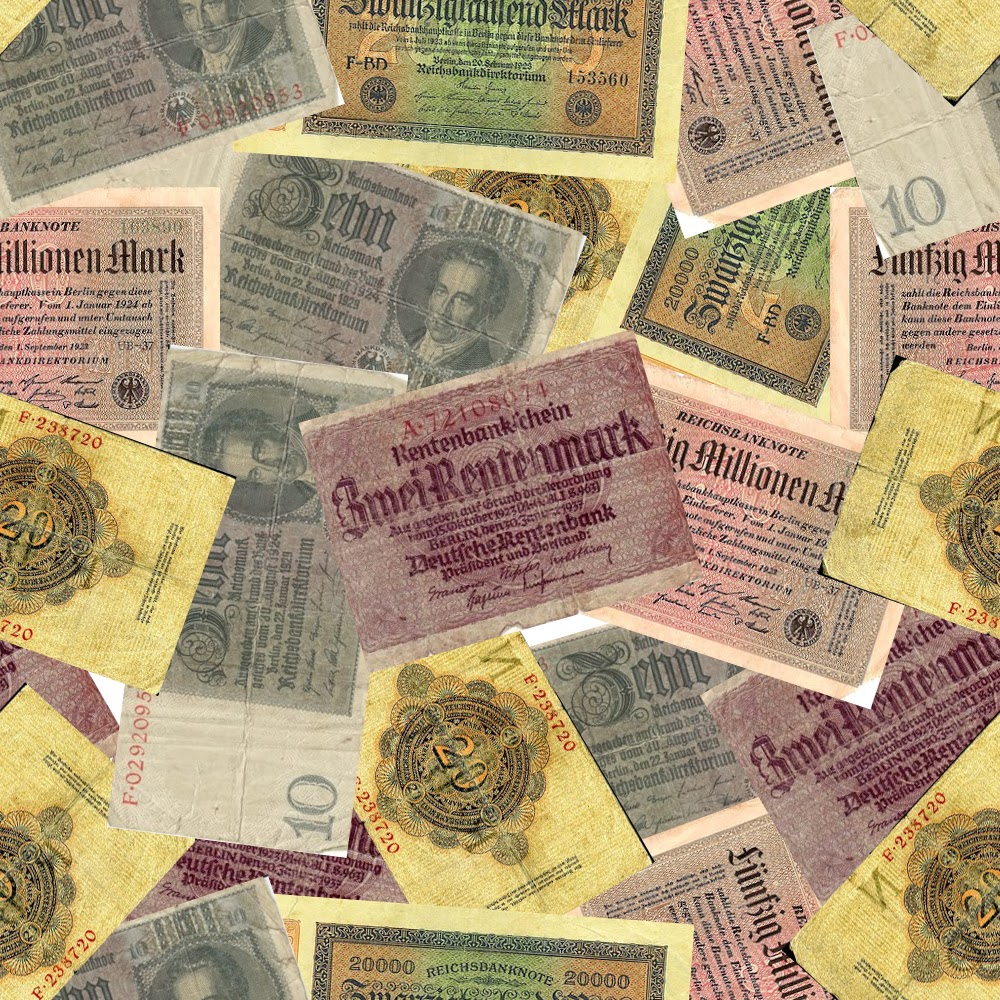
For the “Money” number, the Kit Kat Girls and the Emcee have costumes made from matching fabrics, covered with images of the vastly devalued Deutschmarks. Paper money had become so worthless at the time, that there were bills in circulation at denominations like the 20,000DM note and the 5,000,000DM note.  Jen provided us with an array of images of this money, and we set to work. 

Crafts Artisan Candy McClernan is heading up the surface design effects on this show, and she created a digital textile print design of a seamless repeat using the scattered Deutschmarks. Her print art looks like this:

Then we used local custom fabric printers Spoonflower to order yardage of the fabric for the costumes—silk for the women’s skirts and sturdy cotton twill for the Emcee’s jodhpurs. You can see the fabric online at Spoonflower here.


For one of Sally’s dresses, Jen found a wonderful research image of a woman wearing a dress made in a fabric printed with giant zeppelins. Candy used a combination of digital manipulation and drawing by hand to create a printable version of the zeppelin artwork, and again we used Spoonflower’s digital fabric printing technology to make the fabric for this outstanding dress.

 Of course, we began all of this several weeks before the actors arrived since in order to digitally print fabric you have to allow extra time for the production of it, unlike fabric you can impulse-buy from a store like Mulberry Silks. The fabrics arrived the day after the actors did, so our drapers in the costume shop would have everything they needed to begin work on the patterning and sewing of the costumes!

Monday, February 13, 2012

"Behind the Grime" by Rachel Pollock

by Rachel Pollock, Crafts Artisan

My favorite project on Henry IV is far and away the aging process for Falstaff's fiddleback leather coat, which was custom made for actor Michael Winters in the role. We brought on board tailor Kara Monroe (also a UNC alum from our costume production MFA program) to pattern and construct the coat from three hides of lovely buttery leather. (It had to be big to go over Mr. Winters' prodigious fat padding suit!)

Kara made a beautiful garment, but a just-made coat looks like exactly that: a new piece of clothes! Falstaff is not the sort of man who has a brand new anything in this play, unless it's maybe a brand new bottle of booze. Costume Designer Jennifer Caprio had very clear ideas about the nature of the coat--my notes from our discussion about the aging say:
  • his favorite coat
  • worn it for 30 years in battle/war/bar brawls
  • lays around brothels in it
  • drinks all night in it, passes out in it

Photobucket
Costume design rendering by Jennifer Caprio
 
Photobucket
Michael Winters as Falstaff in a fitting for the coat.
 
I tell my students that the nature of the aging process is twofold. There's breakdown, which might be as simple as laundering a new shirt with washing soda or might be as extensive as ripping a ragged hem or tearing holes in knees/elbows. And, there's pigment age, which might be dipping white shirt in a pot of tea or might be splattering it with paint or ink or dye. For the Falstaff coat, I did very little breakdown, only using a fine grit sandpaper on some of the flat-fell seams and across the tops of the shoulders, just to soften the leather and rough up the surface a tad. The majority of work involved pigment aging--in this case, application of leather dyes and French Enamel Varnish.

French Enamel Varnish, more commonly called FEV in our industry, is a medium that you mix yourself according to your needs. Its components are leather dye, denatured alcohol, and shellac, and your project determines the ratio. If you need something runny, use a minimal amount of shellac; if you need something thick, use a lot of shellac and not much alcohol. Use more dye for more pigmentation, less for lighter hues. Use gloves when you work with it and only apply it in a well-ventilated area. I cut on the big wall vents in my dye shop and, thanks to the mild winter, even opened the windows.

Photobucket
Application of FEV on interior of Falstaff coat.
 
I applied this treatment in four layers, and unfortunately it went fast enough and I was busy enough I only have the one process shot laying on the table. But I can tell you about it! First, I used a dauber to apply tan leather dye to all the seams on the coat. Kara and Jen had put a lot of thought into the construction of this coat and I wanted to highlight that fiddleback seam placement, and the number of gores in the frock. The tan leather dye served to pump up the eye's perception of those seams onstage.

Next, I used a toothbrush to flick the tan dye and some medium brown leather dye up from the hem like residual stains from ancient mud splatters, and also to drip it down from above (like drunk-guy spillage and rain-stain from some bad weather on an age-old battlefield) onto the lapels and chest. I also used a chip brush with the two kinds of leather dye and two related colors of FEV to paint a sort of ombre effect from the hem up, to create some sweat stains in the armpits and around the collar, and to do some allover dry-brush toning.

Photobucket
Front view on form.
 
Photobucket
Rear view on form.
 
Photobucket
Stage shot of ensemble by Jon Gardiner with Michael Winters as Falstaff in foreground.
 
Hope you enjoyed seeing "behind the grime," and if you are in the Triangle area, definitely check out these two plays. They are, quite literally, epic.

- - - - - - - - - -
The Making of a King: Henry IV & Henry V is now playing through March 4. Click here for more information and tickets.

Wednesday, January 18, 2012

Altering Armor for The Making of a King

by Rachel Pollock, Crafts Artisan

On deck at work, we are currently well into production on a pair of repertory shows, Shakespeare's Henry IV and V. The designs for this show are one of those non-era-eras that I like to describe as "postmodern collage"—a mixture of modern and historical styles all blended together to create intriguing looks not tied to any specific time, leather jerkins with jeans and workboots and that type of thing.
I like working on shows done in that way for contemporary audiences because it allows for all the super cool craft stuff that Shakespeare histories pretty much need (like armor!), but it also makes those things accessible to the modern eye in an empathetic way that true period pieces from about the 17th century back don't. It is very hard, in the 21st century visual milieu, to look like an indomitable, ruthless soldier in, say, pumpkin hose and tights.

Our designer, Jen Caprio, is renting and purchasing the armor because there is just SO much of it needed. If we were doing one of these plays, I could have built some, but both in repertory with the bulk of the rehearsal period happening over our winter vacation, that meant too little time and not enough staff to plan the making of any of the big pieces. Instead, one of the biggest responsibilities I have is to make the armor we've rented fit the actors we've cast, without altering it in any permanent way, yet maintain the standard of quality that I expect.
One of the things I stress in my classes is that there is the best way to do something, and everything else is a concession you ought to choose to make. In a classroom context, I teach what I believe to be the best way of doing things, since it is easier to make informed concessions required by things like a lack of time/money/labor than it is to break bad habits of shoddy workmanship. It is exciting to see all these pieces of armor from all different sources and makers, and look at the choices they have made in construction (some of which are helpful and others leave me scratching my head). Today I am going to write about how we reversibly altered a piece of leather armor for our productions in such a way as to maintain its level of quality inside and out.

Photobucket
 Woven leather jerkin from OSF Costume Rentals
 
Photobucket
Shoulder seam detail. I see some grommets I need to replace. Note elements like the integrated D-ring for clipping a gorget to.
 
Photobucket
What's going on with this side-seam's double lacing?
 
Photobucket
...it's hiding a quick-change closure in there!
 
This is the piece in question. It's made from strips of leather woven together and riveted at all the crossovers. The edges are bound with a rollover leather strip binding, and the two halves lace together at the shoulders and sides. It has also been aged and toned with paint and dye effects. We have rented it from the Oregon Shakespeare Festival's costume rental division.
Among regional theatres, the OSF is a powerhouse when it comes to quality armor production. Their pieces are made to withstand not only their own productions' run, but built to last for many shows and rentals thereafter. They make it policy to cut no corners, and their work is categorically levels of awesome: is it great, or is it spectacular? The artisans turning out their pieces know their work can't just be crap that looks decent enough from the front row and can cling on for a two-week run, and it's a pleasure to work on their stuff. OSF costumes are made with longevity and quality at the forefront, because they become assets in the rental side of the company.

So, if it's so great and all, what could we possibly need to do to this thing? Well, the design concept does not include any skirtlike hangdowns. We need to use it, but lose the long tabs along the bottom. Obviously, we're not going to make that happen with scissors and rivets.

For the fittings, to insure that it would work for one of our actors, I had my assistant Whitney use masking tape with a light-tack adhesive to just tape the tabs up inside. The light-tack adhesive would keep them out of the designer's sightlines for the fitting, without damaging or removing any of that great paint treatment. Tape was fine at this point, because why go to the trouble of a more professional finish if it wasn't going to fit any of our actors? So, tape-tape-tape, and off it goes to be fit.

A couple days later, it comes back. Yay, we love it on somebody, so we're using it! Now's the time to figure out something better than tape, because any tape that will hold up to over a month worth of repertory shows with fight choreography is going to damage the piece, which is not only Not Okay in my own personal book, it's Way Not Okay in our rental contract.


Photobucket
Inside of the front with the tabs folded up in the desired style.
 
What will I do? I can't and wouldn't ever cut those tabs off or duct-tape them up. If it were ours, I might consider popping some of the rivets and replacing them with Chicago screws (like a rivet, but with a threaded shaft so they're removable) so I could hold the tabs up that way, but I’m not popping whole rows of rivets on a piece that's not ours.

Photobucket
I took a measure of the area blocked out in black in the image above, for both front and back.
 
I use clips and clamps when I need to hold pieces of leatherwork together, not anything puncturing like pins or tacks.
 
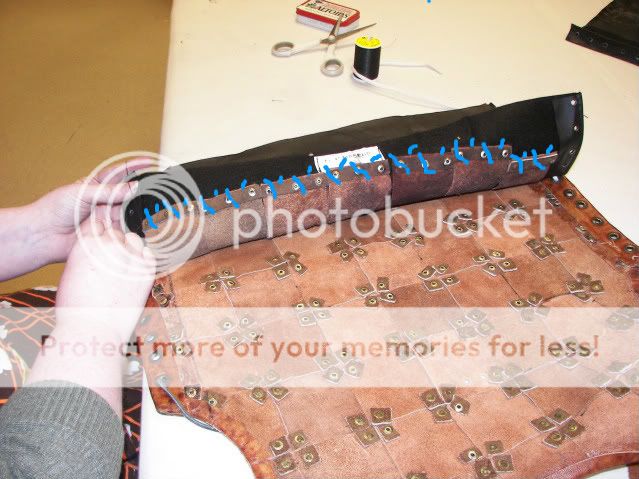
I cut a rectangle for each from a section of black vinyl, doubled back an inch on each end for the lacing sections, then had Whitney punch holes to correspond with the holes in the sides of the garment itself. Above the vinyl insert is clipped to mark the holes for punching. Each vinyl insert is labeled to note whether it's front or back, since they're different sizes, just in case wardrobe needs to remove them at any point.


Photobucket
Crafts assistant Whitney Vaughan shows how she's tacking up the tabs.
 
See those strips at the base of each tab at the back, to reinforce the rivets? Those are only riveted on, not glued also, which meant that Whitney was able to use a heavy carpet thread and slide a needle between them, and whipstitch the tabs to the vinyl insert without ever puncturing any of the leather. Here, the blue lines show a vague diagram of how that stitching runs, for a visual:


Photobucket

Next, she laced the inserts into the armor, thus:


Photobucket
We put Velcro on the insert since it would cover the strip on the armor itself, to maintain the quick-change closure option.
 
Photobucket
Ta-da! Lookout, Hotspur! Prince Hal is ready for you!
 
So, there's one of many armory projects that are moving through my shop these days. I've got another couple in-progress, so once those move onto the Done Rack, I’ll give you the skinny on them as well.

Friday, September 30, 2011

Making hats for "In the Next Room", part 3

by Rachel Pollock, Crafts Artisan

Today, the trimming of the final two hats from In the Next Room!

Recall from prior posts on this topic that the hat trim is intended to be a physical representation of the metamorphosis of the character of Mrs. Daldry over the course of the play, and that the first two hats progressed in decoration from a reserved veiled hat to a more adventurous hat with a single upright "wing."

But what about the third and fourth hats?


Photobucket
Hat #3 features a rainbow ombre-dyed length of embroidered silk, sprays of coq feathers, taffeta ribbon bows, and velvet roses.

Photobucket
Front oblique view.

Photobucket
Rear oblique view.

Photobucket
Hat #3 worn onstage! Wow, how flamboyant and fabulous it looks! Katie Paxton as Mrs. Daldry, Matt Garner as Leo Irving, Kelsey Didion as Mrs. Givings. (Photo by Jon Gardiner.)


In the fourth hat, the theme of metamorphosis becomes encoded in a fairly literal symbol: the butterfly. Designer Anne Kennedy wanted to expand the adornment of the hats from the fairly traditional realm of fabrics, ribbons, flowers, birds and bows, to encompass what would appear to be actual butterflies (which are really made from painted and dyed feathers)! What fun!


Photobucket
We purchased the butterflies from a floral supplier, but they were too bright (top row). You can see how we sprayed down the brightness with a mist of black paint (bottom row).

Photobucket
Millinery assistant Leah Pelz then assembled some of them into these ornamental sprays.

Photobucket
Whoa. Now that's Hat #4.

Photobucket
In addition to the butterflies, some of the adornments include 9" wide satin ribbon, taffeta ribbons, faux grasses, feathered sprays, faux rosehips, and a red raffia thistle.

Photobucket
Oblique view.

Photobucket
Rear view.

Photobucket
This image shows the hats ready to go into the dressing rooms. I always pin these detailed hat care documents onto each head for the wardrobe crew, so they know how the hats are to be worn and stored safely.


Unfortunately, I don't yet have a stage shot of the fourth hat, but i'm sure you can tell from the other three onstage, how fun it looked!

Tuesday, September 20, 2011

Making Hats for "In the Next Room"

by Rachel Pollock, Crafts Artisan

We're working on a really fun set of hats for the next show at work, Sarah Ruhl's In the Next Room (or the vibrator play). The script is set in the 1880s, which means some great bustle costumes and of course hats!

The action of the play takes place over a couple of months, and the character for whom I've got the most craftwork is Mrs. Daldry, who undergoes a process of self-discovery. Our costume designer, Anne Kennedy, came up with a great way of expressing this through Mrs. Daldry's hat. Riffing off the idea that women would have a favorite hat retrimmed in whatever the new fashion was, Mrs. Daldry is to appear in each scene with the same basic hat style, but trimmed ever more frivolously and exuberantly. Fun!

We initially discussed whether this would be a single hat with interchangeable decor "appliances" that the wardrobe crew would change out between scenes, but I decided instead to do four identical hats trimmed differently, to instead create the illusion of the same hat being retrimmed.


Photobucket
Not the right period, but a great illustration of how the basic hat shape itself is only part of the final look!
Same face, same dress, same hat base, but such different personalities!


There were several reasons for this decision, most of which had to do with making the wardrobe crew's job easier. PlayMakers is a professional regional theatre, but we reside on the campus of the University of North Carolina at Chapel Hill, and as such everyone on the theatre's staff is essentially doing double duty as artists and as teachers in practicum--UNC's students in the department of dramatic art have the invaluable opportunity to work alongside us to produce PlayMakers' shows, and among those opportunities is in a wardrobe crew capacity. Our Wardrobe Supervisor, Whitney Vaughan, leads a team of undergraduates who (for class credit) learn the ins and outs of backstage costume support for the run of each show.

I figured, our crew is already going to be learning SO much new information and unusual costume rigging (like how to help actresses put on corsetry and bustle cages and wigs and hats), that to keep the hats as straightforward as possible would only be a help. It is much easier to keep track of four separate hats backstage in the dark than to keep track of four batches of fiddly hat trim that snap or hook on and off of a piece. It's easy to accidentally drop or crush a feather spray attached to a pouf of fabric, but a hat is a more tangible item less easily damaged or lost. And, if the basic hat style was one we could block in felt, making multiples is actually (for me) less work, all told, than retrimming the same single hat four ways and then troubleshooting how to stabilize each "edition" into single quickly-removable units.


Ms. Kennedy sent us a large research packet of historical images showing hat styles she liked for the character of Mrs. Daldry. Then, I looked into options of block shapes for brim and crown styles, among blocks we own or could makeshift.


Photobucket
Research example of the "flowerpot" hat crown shape Ms. Kennedy wanted.
No joke, they don't call that shape a flowerpot for nothing!

Photobucket
$3 terra cotta flowerpot of the proper scale, getting sealed with polyurethane.

Photobucket
First i blocked an old hat crown onto it, to look at with our desired brim block.
(Read about how I made this brim block from esparterie here.)

Photobucket
First stab at blocking the first crown on the flowerpot...

Photobucket
It worked! Look what a cute conic-section crown it produced!

Photobucket
My assistant, first year grad Leah Pelz, blocked the remaining three hats.
Here they are in various stages of processing.


I'll stop there for now, because we're about to start tech on the show, but a second post is yet to come to show you the four different means of trimming these hats out!

Wednesday, April 13, 2011

Tar and Feathers and BIG RIVER!

A new "behind the scenes" video! See Costume Designer Bill Black and Crafts Artisan Rachel Pollock give an inside look at the famous "tar and feathering" scene in Big River.

Video by Braxton Hood.

Big River runs April 6 - 24, 2011. Explore the show here.

Thursday, March 10, 2011

Glimpses of BIG RIVER costumes

by Rachel Pollock

Our final show of the season, Hauptman and Miller's musical Big River, is in full swing in the costume shop at PlayMakers, and though I don't have any completed projects to talk about yet, I do have some glimpses behind-the-scenes of things we're working on...


Photobucket

Shoes await rubberizing in the crafts facility.

Photobucket

Freshly-begrimed raffia for the Royal Nonesuch dries in the dye shop.

Photobucket

The Duke's shirt being dyed the perfect shade of yellow in our vat.

Photobucket

Tar-and-feather samples for The Duke.

Photobucket

Jo Harper's hat on the electric hat stretcher.

Photobucket

Tom Sawyer's spiral straw braid hat is almost complete!